Category Archives: home & interior

Guest post: Low Environmental Impact Building Ideas

With global populations on the rise, the environmental impact of our day-to-day lives on the forefront of many people’s minds, and fossil fuels proving to be completely unsustainable at the rate we’re consuming them, many are looking for ways to make their lives greener. For those building a home, or looking to retrofit their existing home, the question becomes even bigger: How should they ensure that their living space, potentially for the rest of their lives, have the lowest environmental impact they can manage?

Low Environmental Impact Building Ideas

Image Source – Pixabay

First and foremost, it’s important to remember that all building is going to have some impact on the environment. It’s impossible to go completely green – but that’s okay. Remember, too, that it’s much more environmentally sound to update and retrofit an already existing home, rather than demolish and build from scratch.

Choose your materials wisely
Whether you’re building a new home or adding on to an existing one, be sure to consider the materials you’re sourcing to build it with. Some people choose to look into straw-bale housing, or bags of earth – but more traditional materials can be used, too, depending on how you get them.

Look for what you have in your area, and try to avoid factory-produced materials such as concrete, plastic, metal, and bricks (unless, of course, you’re recycling them – then go all-out!). Things like timber, clay, lime, hemp, and stone can all be sourced locally depending on where you are, and don’t have the carbon footprint things that are factory-produced do. You also don’t have to worry about the impact shipping your materials would have!

Keep it small
Unlike the old adage, bigger is decidedly not better: a small home means less materials, less heating and cooling costs, and less electricity usage. A large home simply cannot have a low impact – it can only take steps to reduce the large impact it has. Don’t fall for claims that state otherwise.

Similarly, a compact house will lose heat and cold less rapidly than a larger house will. If you need a space with 2,000 sqft, try considering a storied home rather than a single-floored home. It’s the same basic principle as the very energy-efficient igloo: the less surface area the home has, the lower the heat loss will be.

Insulate and seal
Surface area is only the beginning of sustainable housing. The smallest house will still bleed heat and cold if it’s not insulated well – and even a larger home will see a huge reduction in energy costs by ensuring it’s insulated properly. Since heating and cooling are the largest energy consumers in the household, accounting for around 50% of household energy consumption, cutting down those costs will have a huge effect.

Sealing air-flow and cutting off drafts is a lesser-known but similarly-impactful way to cut down heating and cooling costs. Areas around doors and windows are the biggest culprits, but looking for cracks and gaps anywhere in the house, including along electrical wiring holes, and sealing them up with caulk or closed cell spray foam, can go miles towards ensuring the heat and conditioned air you’re pumping into your house, stays in your house.

Looking to reduce those costs even more – and willing to try something out of the ordinary? Earth sheltering is on the rise as the lowest-impact way to cut heating and cooling to next to nothing. An ancient technique, it relies on the earth’s natural insulating abilities, and comes with the benefits of being low-maintenance, fire-resistant, and well-protected against storms. There’s a wide variety of ways to work earth sheltering into a home, from roofing to caring into a hillside – learn what works best for you.

Invest good appliances
Using energy-efficient appliances is the quickest and easiest way to reduce environmental impact in the home. While a bit more expensive, looking for an Energy Star label when buying new appliances is a great way to reduce the footprint of an already existing home, or get a new home fitted in the right way. Everything from air conditioners and water heaters, to fridges, toasters, and TVs can have Energy Star ratings, so do your research and look around.

Another, often-overlooked way to reduce impact is to look for LED lighting in your home. LEDs have a very low cost for the amount of energy they provide, so while their upfront price may be more, expect to see drastically-reduced electricity costs – and a longer lifespan.

Even your plumbing can be looked into. Toilets, for example, are being made with water conservation in mind; look for a dual-flush toilet, where you can choose if you need a smaller or larger amount of water. All other fixtures, like showerheads and faucets, can be fitted to have a reduced flow, as well.

Use natural sources instead of grid-based
Getting solar panels installed, especially in climates closer to the equator, are a fantastic way to reduce electricity costs during the day. Reduce them even further by orienting your house in a way that will get the most out of the sun’s warmth, especially in winter, to help offset heating costs. If you’re okay with having less on-demand hot water, looking into solar-heated water is another way to reduce your energy costs with the sun.

Similarly, tapping into rainwater collection is a great way to compliment water-efficient plumbing. Even just connecting gutters and other runoffs to barrels can go a long way towards providing for your home. Untreated, it can be used to flush toilets and water gardens; if you’re willing to look into treating water, rainwater can be used for everything from drinking to cooking.

If that’s not enough, try looking into other renewable resources in your locale. Is your home in a good place for a windmill? Can you tap into the earth’s natural warmth and look into geothermal heating? Explore your options with a contractor who’s familiar with sustainable resources.

Build to last
One of the most overlooked ways to build a sustainable home is to build a home that will last you for years to come. That can mean any number of things – whether you simply want something that will stand the test of time, or if you’re looking for a home you’ll want to live in for years to come.

Sources:
https://jorgefontan.com/sustainable-house-design-21-ideas/
https://www.lowimpact.org/lowimpact-topic/0-natural-building-intro/
https://www.conserve-energy-future.com/top-15-green-home-building-techniques-and-ideas.php
https://www.smallfootprintfamily.com/eco-friendly-home-building

Guest post by Craig Scott – editor at Green and Growing

SaveSaveSaveSave

SaveSave

SaveSave

SaveSave

SaveSave

SaveSave

SaveSave

Songmics Storage Ottoman review

Disclosure.  This post is a review of a product I was sent for free.  All opinions are my own.

Now I don’t know about you, but in our household, the boys seem to amass new possessions much more quickly than I can persuade them to filter things that they have really grown out of to either the charity shop or their younger cousins. So it is a continual struggle to keep on top of the mess and clutter that goes hand in hand with them. So I was delighted to be offered the chance to review a Fabric Folding Storage Ottoman Bench from Songmics for free.

Songmics Ottoman

The ottoman arrived flat-packed and you literally unfold the base to assemble in seconds. Couldn’t be simpler. Plenty of storage space inside for some of the boys’ toys and a comfortable padded seat on top. We’ve chosen to put it in the boys’ play area and they are now using it as a seat when playing video games. It is wide enough for both of them to sit together. A definite improvement rather than just sitting on the floor.

This product retails on Amazon, currently priced at £26.99 and comes in a choice of three colours, dark brown, grey and light grey. I opted for the brown which looks very nice against our terracotta carpet. A good quality sturdy product and very good value in my opinion.

According to the packaging, it has a maximum weight capacity of up to 300 kg. It does have a strange odour on the interior when new, but this wears off in a few days.

Songmics Ottoman

Do take a look at the Songmics UK Facebook page. They have a wide range of household products including interlocking storage units fairly similar to the one we purchased and assembled recently for our shoes. Wish I’d heard of this brand sooner.

And I’m hosting a rafflecopter competition to giveaway a Fabric Folding Storage Ottoman to one lucky winner.
comper friendly badge

A Rafflecopter giveaway – Please click on the link to enter.

And you may see my other giveaways here.

I’d love to hear your top storage tips. I’m thinking another of these would be ideal for spare bedding.

Visit Yet Another Blogging Mummy on Facebook, Twitter and Instagram

Family Fever


Are you sitting comfortably including giveaway?

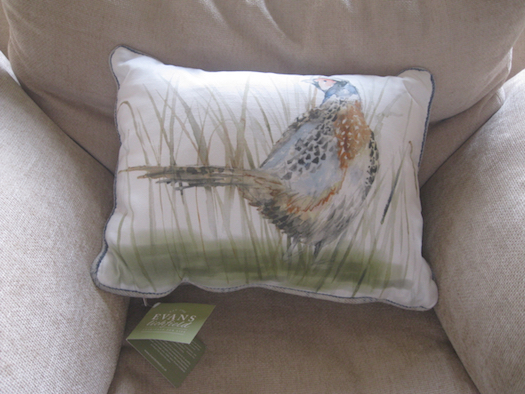
I’ve received a very attractive cushion, free to review from Evans Lichfield. It was a surprise as to which one they would choose from their wide selection and I was delighted to receive a gorgeous pheasant design from their country range.

Evans Lichfield Pheasant Cushion

It is very comfortable and now I’m just wondering where they have installed a secret camera here, as it compliments my lounge furniture beautifully.

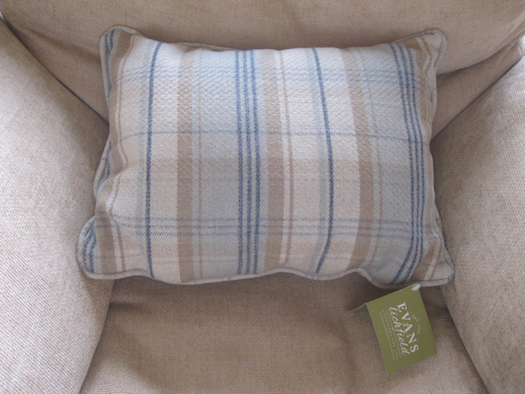
This cushion measures 43cm by 33 cm and has a nice tartan pattern on the reverse for when you fancy a change of style. The fabric is dry-clean only and it has been handmade in England. The current RRP for this design of cushion is £19.99 and you may check Evans Lichfield website for stockists. A great value item in my opinion to purchase either for yourself or as a gift.

Evans Lichfield Pheasant Cushion

You may also purchase matching fabric in a 140cm width in this design if you fancy making your own home furnishings. The design is also available in canvas wall art, tea towels and tote bags.

Evans Lichfield is a British family run home furnishings business that has been going since 1988. They work with a host of in-house artists as well as British artists to create their designs, with a host of products available including cushions, canvas wall-art and fabric-by-the-metre. You can view their whole collection on their website. There are loads of lovely designs for lounges and bedrooms.

And I’m hosting a rafflecopter competition to giveaway a pheasant cushion courtesy of Evans Lichfield to one lucky winner.comper friendly badge

a Rafflecopter giveaway – Please click on the link to enter.

And you may see my other giveaways here.

I’d love to hear how you use cushions to enhance your home.

Visit Yet Another Blogging Mummy on Facebook, Twitter, Google+ and Instagram

Family Fever

Disclosure. This post is a review of a product I was sent for free. All opinions are my own.

Weatherproofing

Hopefully the end of Winter is in sight and Spring is on the way. So it is now time to start thinking of outdoor jobs again.

One job on my agenda is to weatherproof the new box that has just been replaced for my water purifier. The old box was only five years old, but the wood was starting to rot, probably partially earlier than need be, due to not having been weatherproofed. So I don’t intend to make that mistake again.

And I have received 2 tins of Matt Clear Sealer free to review from Rust-oleum. Just the ticket for this particular job. My first top tip is always remember to measure up the area of your project before you start. 1 tin would not have been enough for the size of my box.

Rust-oleum Clear Sealer paint

It has been quite difficult to find a suitable gap in the weather for outdoor painting, especially as this product requires a minimum of 10 degrees. It has either been too cold or too wet. But I took the opportunity yesterday as it looked bright and 12 degrees. However I had barely started the painting when it greyed over and began to rain. Luckily it was only spitting, but it did make me rather rush the job, so the end result does look a bit streaky. Not the fault of the product though and at least the box is now better weatherproofed. With hindsight, I should have waited until today, as 14 degrees and no rain. But it is forecast to be back to single figures again tomorrow.

So here are the photos before the box was painted.

Weatherproofing the water filter box

Weatherproofing the water filter box

Weatherproofing the water filter box

I took the lid off, in order to paint the base first. And did the area near the top first, in order to give it a chance to start drying, since the rain meant that the lid needed to go back on asap. Otherwise I had originally planned to paint all the base, then wait an hour before replacing the lid and painting it.

Weatherproofing the water filter box

And just after painting.

Weatherproofing the water filter box

And finally the next day once the paint had dried. Ready to face the elements.

weatherproofing the water purifier

The clear sealer paint comes in a 125ml tin. There is also a satin finish variant. It is available from Homebase, currently retailing at £4.99. Also available at B&Q and other stores.

And my other top tip is to use the right size brush for the job. I thought my paint brush was the right size for the area I had to cover, but found it was just too big to fit easily into the tins.

So I’d love to hear what spring-time projects are on your to-do list?

Family Fever

Disclosure. This post is a review of a product I was sent for free. All opinions are my own. 

A Christmas branch

I love making natural Christmas decorations. so on a Winter woodland walk I grabbed myself a large dead branch from the ground. Ideal for the project I had in mind. Although note to self for future reference, try and do this near the end of the walk rather than the beginning. It was rather cumbersome to carry several miles especially through gates, and I did get it snagged on barbed wire a couple of times.

I had received some silver glitter spray paint free to review from Rust-oleum and this was what I was going to use to jazz up my branch.

Rust-oleum glitter spray paint

Luckily the weather was dry enough and not windy for me to be able to spray the branch outside, as I’m sure if I had attempted it inside, that I would have ended up with paint flecks on everything nearby. I removed the remaining leaves first.

A Christmas branch

I’ve never used spray paint before but I found it is very simple to use. No brushes needed. However I was anticipating it to give quite a deep silver colour. Instead I found it was almost translucent. Looks very nice still, but doesn’t show too well in the photos. Perhaps I should have given it an extra coat.

A Christmas branch

It dried to the touch very quickly and the instructions indicated that it would be hard dry in 24hrs, so I left it in the garage overnight. Then I stood my branch in a plant pot and filled it with small pebbles, to ensure the branch was stable. And finally I hung Christmas baubles on my branch.

A Christmas Branch

I was very pleased with the finished result and it was very quick and easy to do. Next project is to make a Christmas display with the pine cones that I painted last Easter.

The silver glitter spray paint comes in a 400ml aerosol can. It also comes in gold. It is available from Homebase, currently retailing at £9.49. Also available at B&Q and other stores. A nice product but don’t rely on it looking as bright as the image on the can.

So I’d love to hear what craft projects you are making for Christmas?

Family Fever

Disclosure. This post is a review of a product I was sent for free. All opinions are my own. 

Guest Post: Designing a Kids’ Room that Grown Ups Love Too

by Kaitlin Krull

Whether or not you consider yourself to be a style guru, design and decor are important parts of home life. It can take months of planning, deciding, and DIYing to make your house feel like home. At Modernize, we know that styling is just as important in kids’ rooms as it is in the rest of the house. Taking the time to design your kids’ bedrooms can feel like more work than fun when your design wants and needs are often outweighed by Disney characters and princess castles. Here are some fantastic kid bedroom design ideas that you will love, too.

Cabin/loft beds

When done tastefully, loft beds can be a fantastic option for your kid’s bedroom. In addition to being cooler than the average bed to your little ones, you have the extra benefit of storage within the bed frame. Choose from bespoke options with storage drawers and desks underneath, or get extra creative with a reading nook or deep, dark cave for added imaginative play.

kids bedroom ideas

via Modernize

Monochrome

Black and white bedrooms are all the rage in modern, hipster design collaborations. For the ultimate monochromatic room, choose high contrast black furniture with white walls and bedding. The best part about this kind of kid’s room design is it’s almost impossible to get wrong.

kids bedroom ideas

via Modernize

Bohemian

A bohemian bedroom design is perfect for both kids and adults because it looks just like the bedroom you wish you had as a pre-teen without seeming too grown up. Embrace your love for flowy, gauzy fabrics and eclectic accessories to create a kid’s room that doesn’t scrimp on individuality.

kids bedroom ideas

via Modernize

Shabby chic

Channel Kirstie Allsopp and her flair for traditional, handmade designs with floral curtains, pastel fabrics, and embroidered cushions in your kid’s room. Add an upcycled dresser and vintage bed and you will be well on your way to becoming the next handmade queen.

kids bedroom ideas

via Modernize

Grown-up kid rooms

The best part about designing your home is that you can do pretty much whatever you like. If you want continuity with your personal design style, style your kid’s room in exactly the same way as the rest of your house. Just a word of warning: this option usually only works for a few years. Once your kids become aware of the world around them, it will be hard to stay away from CBeebies characters and the wonderful world of Disney, so style away while you still can!

kids bedroom ideas

via Modernize

Bold accents

Kids bedroom decor is especially exciting because you can generally get away with bolder design choices than in the rest of the house. Choose one or two items in your little ones’ room to use as focal points. A brightly painted wall or a few large modern art prints will do the job nicely and give your room a pop of color and more than a little bit of individuality.

kids bedroom ideas

via Modernize

A golden Easter display

I recently received two free products from Rust-oleum to review. I’ve already blogged about using their dry wipe paint to upcycle an old pinboard into a whiteboard and now I’m going to tell you what I did with their metallic gold paint.

Rust-oleum metallic gold paint

This was a product that I had originally expected to receive last year, although in spray format. And I had collected some pine cones last autumn ready to use in making Christmas decorations. So instead I decided to still paint the pine cones gold and use them in an Easter display for now. Then nearer Christmas time, I will convert them into decorations as originally planned.

Easter pine cone display

This was a lot simpler to use than the dry wipe paint, as I just needed to give it a quick stir after opening the tin to blend it, and then I was ready to start. I used a small brush but even so, a pine cone is quite fiddly to paint and would probably have looked a lot better with a spray paint. Perhaps I should have kept an old lamp that I recently gave away. With a new shade, it would have looked very nice painted gold.

Pine cones painted with Rust-oleum gold paint

Pine cone painted with Rust-oleum gold paint

It recommended leaving it 30 – 60 minutes to dry, but I actually left them overnight.

Painting pine cones with Rust-oleum gold paint

The gold paint comes in a 250 ml can and is certified Toy-safe so you can use it to decorate children’s toys and furniture. It is available from Homebase, currently retailing at £7.99. It also comes in silver. Good value and suitable for lots of projects. I do recommend this product.

So I’d love to hear what projects you would use this type of paint for? How about picture frames, dishes or vases.

Family Fever

Disclosure. This post is a review of a product I was sent for free. All opinions are my own. 

Upcycling project – creating our own whiteboard

I have received two free products from Rust-oleum to review, the first of which is their dry wipe paint. You’ll have to watch out for another blog post to hear about the other product.

Rust-oleum dry wipe paint

Initially before the product arrived, I had a big plan. I intended to convert son1’s wardrobe doors into a large whiteboard area that he could write on. He has always been a bit naughty about writing and drawing on walls, even fairly recently when he is old enough to know better. So I thought this would give him an area to express his creativity without getting into trouble.

Rust-oleum dry wipe paint

However once the product arrived, I decided to downsize the plan, as when I opened the box, I found it contained two tins – a smaller tin A and a larger tin B. Reading the instructions, I was uncertain of the proportions to use of each. It talked about pouring B into A, but how much? B was bigger than A, so certainly wouldn’t all fit in tin A. It also said to apply within 10 minutes of mixing and to recoat after 2 hours. I concluded it would be best to mix some of A and B in a separate paint tray and hope that I got the proportions okay.

I therefore decided to downsize the plan to instead upcycle a small pinboard into a whiteboard. Luckily I hadn’t described the project to son1, so he won’t know there has been a change of plan. This meant there would be plenty of paint leftover to try again if my proportions were wrong. I also missed out the step to apply a primer first, since I hadn’t been sent a primer. The original email had mentioned a magnetic primer, but when I opened the package, I found this hadn’t been included. That could have added another fun element to the project, a magnetic whiteboard, as the boys love magnets.

It also recommended that for part A, the activator, you should wear protective gloves and eye protection. I don’t have any safety glasses, but I did pop a pair of disposable gloves on, before I opened the tin. I then poured some of part A into my paint tray, followed by some of part B. I mixed them together for the recommended 2 minutes before applying a first coat to the pinboard. I then washed away any spare paint from the tray and roller, ready to start again in a couple of hours time, at which point I repeated the process for the second coat.

Making a whiteboard with Rust-oleum dry wipe paint

The next thing is to allow the dry wipe surface to cure for 5 days at 20 deg C or to allow more time in cooler temperatures. I decided to wait a week in that case.

Fast forward one week and I presented the whiteboard to son1 along with a washable marker pen. I waited with bated breath whilst he wrote his first message, then I tried to rub it off initially with a piece of dry kitchen roll. This did leave a slight blue smudge, so I tried again with a wet cloth. Result, it cleaned off perfectly, ready to use again. My worry about whether I had got the proportions right was over. I was very pleased and so was son1. He is loving his new whiteboard and he can still use it as a pinboard too. A step up from his old toddler magic drawing board which he had never let me get rid of.

Making a whiteboard with Rust-oleum dry wipe paint

Making a whiteboard with Rust-oleum dry wipe paint

The RRP for Rust-oleum dry wipe paint is £34.99 and it is available from B&Q, Homebase and other leading stockists. More information is on the Rust-oleum website. The product comprises 200 ml of the activator and 800 ml of the white gloss. I’ve no idea if this is good value or not as it is such a niche product. It is obviously a lot more expensive than just purchasing a litre of gloss paint. But I do recommend this product although I would prefer it to be made clear on the instructions as to optimum proportions of part A and B. And also whether it was necessary for me to dispose of spare activated paint after coat 1, or did I misinterpret that and needlessly wasted some of the product? I don’t know.

I also noticed the tag line on the box said Trusted Quality since 1921 and that Rust-oleum products are manufactured very near to where my grandparents used to live. My grandad was a painter and decorator, so I wonder if Rust-oleum might have been his brand of choice?

So I’d love to hear what projects you would use this type of paint for?

Family Fever

Disclosure. This post is a review of a product I was sent for free. All opinions are my own.