Tag Archives: chicken

A New Healthy Life: Balanced Life Cookbook by Christine Robinson – book review, giveaways and freebie

Disclosure.  This post is a review of an e-book I was sent for free.  All opinions are my own.

I have received a free e-copy of A New Healthy Life: Balanced Life Cookbook by Christine Robinson to review. I was very pleased to be asked to review this book, as I love getting inspiration of new ideas for what to cook.

A New Healthy Life Balanced Life Cookbook by Christine Robinson

Here is the book blurb.

Start your journey to a healthier and more balanced lifestyle with A New Healthy Life: Balanced Life Cookbook. This comprehensive cookbook provides readers with all the tools they need to create delicious, nutritious meals that are quick and easy to prepare. Inside, you’ll find simple recipes, meal planning tips, kitchen tricks, and snack ideas that are designed to help you develop healthy eating habits, while also providing alternatives for individuals with dietary limitations. With this cookbook, you’ll learn to make flavorful, nutrient-rich meals that will nourish your body and fuel your soul.

The first few chapters of this book are talking about healthy eating. It is a good introduction as far as it goes but in my opinion there are key elements that have been overlooked. For instance, there are several references to healthy fats and unhealthy fats, but I didn’t spot any mention of which fats fall into each of those two categories.

As a number of the recipes include olive oil, it would be useful for the introduction to describe how much more healthy it is to purchase cold-pressed extra virgin oil, preferably in the smallest size bottles, versus regular olive oil.

Also the introduction makes it sound like we should avoid fried dishes, but not so. I consider my diet to be healthy and yes I do fry sometimes, dishes like omelette or stir-fry.

And after that initial viewpoint on frying, I was quite surprised that the author had actually included some fried recipes, but even more so, that both her vegetarian stir-fries listed 1 tbsp vegetable oil in the ingredients. All vegetable oils are unhealthy fats in my opinion. Unfortunately they are in many processed products including mayonnaise, another ingredient included in a few of the recipes, which again, along with the vegetable oil, I wouldn’t have expected to see in a cookbook targetted at healthy eating. And yes before you point it out, I know, I do need to revisit my own blogged recipes, as many were written before I attempted to remove all seed oils from my diet.

Thankfully her other fried recipes used olive oil which along with other fruit oils is a healthy fat, but even so, did the frittata, tomato and basil soup, turkey chilli and leman garlic shrimp pasta really need as much as 2 tbsp of olive oil. That quantity sounded quite excessive to me and seemed inconsistent with some of her other recipes which did use less. Personally I am careful to wipe just a smear of either animal fat or extra virgin olive oil in the frying pan. That’s all it needs to avoid the food sticking so long as you heat the pan first.

And I couldn’t understand why the zucchini noodles with pesto and grilled chicken required any oil to be added to the grill pan, let alone 2 tbsp. Isn’t the whole point of grilling, that the food is on top of the grill rack, so that any excess fat drips through?

To note some of the recipes could be made even healthier. For instance, I frequently eat overnight oats, but I’ve never needed to add honey or maple syrup which is suggested here, as the fruit is sweet enough.

Illustrations are important to me in a book and it starts well with a photo to accompany every recipe in the breakfast chapter. But from then onwards, the pictures become very intermittent. 2 for lunch and 1 each for the other chapters. What happened?

Some more proof-reading is required as most of the recipe is missing for Roasted Vegetable Pasta, so I can’t tell if it might have an excessive amount of olive oil. But 1/4 cup sounds like it could be a lot. I always get confused by measurements in cups, as I never know which of my different size cups to choose, so I certainly don’t know how many tbsp, a 1/4 cup equates to.

Whilst I’m on the topic of measurements, oven temperatures are only mentioned in Fahrenheit. It would be much more universal to include Celsius and Gas Mark too, as readers will be frustrated if they have to go online to find out the conversion.

It was good to see a chapter included on Gluten-free and Dairy-free recipes, although with only 3 recipes, it did feel rather a token nod. However, some of the recipes in other chapters would also be suitable for these diets.

It would be useful to include a recipe index and how many servings the recipes are for, as they clearly varied from 1 serving upwards. Not essential but an indication of preparation time would be useful too.

So does Healthy Eating mean we can’t have dessert? There was no dessert chapter in this 113 page book. I’m sure there are some healthy desserts.

To summarise, some nice recipes, but otherwise this book could go much further.

A New Healthy Life: Balanced Life Cookbook is available on Amazon in paperback or Kindle format.

Christine Robinson is a pen name of Nikk’s Micheal who also writes romantic fiction and you may see Nikk’s website here.


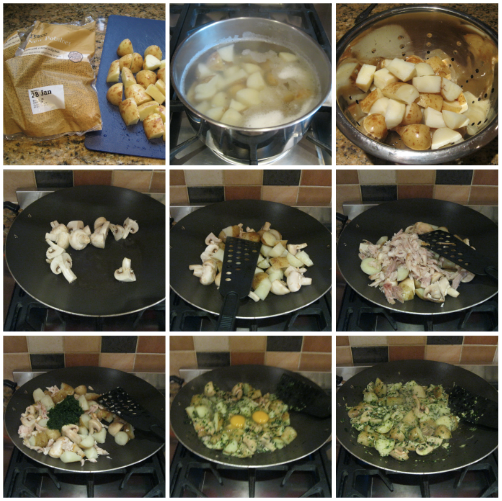
Of course a key element of reviewing a cookery book is to try making some of the recipes. So my first choice was to make Grilled Chicken with Quinoa Salad. I was keen to give this a go as although I frequently cook chicken, I have never grilled it. What a perfect healthy idea, as any fat will drip through the rack. This was really tasty but I do have some comments to make regarding the recipe.

Grilled Chicken with Quinoa Salad

Grilled Chicken with Quinoa Salad recipe

Grilled Chicken with Quinoa Salad recipe

Firstly I feel it is insufficient to just state to cook the quinoa according to package procedure. Playing devil’s advocate here, but I buy my quinoa loose, plastic-free, so I have no package instructions. And in fact this seems to be in line with the author’s budgetting tips of purchasing in bulk.

I would expect the recipe to detail how to cook the quinoa. Since the ingredients state 1 cup of quinoa and 2 cups of chicken broth, my assumption would be that you cook the quinoa in that quantity of broth, but I did some research online and it did seem like 2 cups of liquid might be insufficient. I started with that quantity, but had to top it up a couple of times as all the liquid was absorbed before the quinoa was cooked. I ended up using between 3-4 cups of liquid.

And secondly the recipe does not specify whether the quinoa should be cooled before combining with the other salad ingredients. I made the assumption to let it cool first.

Grilled Chicken with Quinoa Salad

Quinoa Salad

Plus I’m hosting a rafflecopter competition to giveaway a paperback copy of A New Healthy Life: Balanced Life Cookbook to one lucky winner. Open worldwide.

For those of you, who also enjoy the romance genre, please note that all giveaway entrants who sign up to Nikk’s Micheal newsletter via the Rafflecopter will also receive a freebie – an eBook version of her romantic fiction tale “Love in the City”.
comper friendly badge

a Rafflecopter giveaway – Please click on the link to enter.

I’d love to hear your suggestions for healthy eating?

Finally if you’re quick, Nikk’s Micheal is running another giveaway herself to win a box set of The Love Chronicles books. Closes 11 August.

Visit Yet Another Blogging Mummy on Facebook, Twitter and Instagram

Chicken Fajitas with Spice pods plus giveaway

Disclosure.  This post is a review of products I was sent for free.  All opinions are my own.

It has been a little while since I shared a recipe post, as I rather lost my blogging mojo lately following my mum’s death. But now that I am confined to my home apart from when I am volunteering to help the vulnerable or a quick essentials shopping trip or a daily run / walk, it seems time to take up the blogging mantle again.

I think I got my love of cooking from my mum, although it had been a while since she had been able to cook due to increasing frailty herself. As a small child, I can remember kneeling up on a stool at the kitchen table beside her and learning to make the likes of jam tarts and gingerbread men. My mum would encourage me to enter the children’s cookery section at the local WI show. And when I unwisely chose broccoli and melon as ingredients for my cookery practical exam, it was my mum who searched to locate them for me. Those were the days before such items became commonplace on the supermarket shelves all year round. And now for a different reason, they may again have disappeared from the shelves.

I’m certainly feeling rather sad about all the panic buying we are seeing currently, as I’m sure it is leading to increased food waste, particularly with regards to fresh food. So it may still be a little while before I feel ready to post again on my series of “Reducing Waste” topics.

The Spice Pioneer

However after turning down a few product review requests whilst grieving, I agreed to do a review for The Spice Pioneer, who caught my attention due to their fabulous tree planting initiative. They kindly sent me a set of their five flavours of spice power pods to try for free. The flavours, which can also all be purchased individually are as follows…..

Fajita
Chicken Lollipops
Chilli Con Carne
Katsu Curry
Peri-Peri Chicken

Spice Power Pods


So I decided to try out the Fajita Power Pod first and cook a tasty Tex-Mex dish of Chicken Fajitas, along with all the traditional accompaniments. The power pod box includes this recipe on the back. However I did adapt it slightly to include an additional vegetable, namely courgette, as due to empty shelves, I couldn’t get three colours of peppers.

Chicken Fajitas

Chicken Fajitas

Ingredients (serves 4)

Fajita seasoning
2 cloves of garlic
1 tbsp oil
1 onion
3 mixed bell peppers
4 skinless chicken breasts

Method

Peel and slice onion.
Peel garlic and squeeze through garlic press.
Slice pepper, (saving seeds to sprinkle in a salad).
Slice chicken into 1cm strips.
In a large bowl, mix the fajita seasoning, garlic, oil, onion and peppers.
Add the chicken, mix to coat evenly and marinade for 10 minutes.
Stir- fry in a large frying pan on medium to high heat for 10-12 minutes or until chicken is cooked through.
Add more oil while cooking if needed.
Enjoy in heated tortilla wraps with guacamole, salsa, sour cream and a sprinkle of cheese.

chicken fajitas

I made a batch of tortilla wraps and you can see my guacamole recipe below. But I did cheat with the salsa and used a shop-bought jar. However part of the joy of power pods is the simplicity with the spices being perfectly portioned, so I didn’t feel at all guilty for cheating. In fact, I wished that I had cheated with guacamole too, as my avocado was rather under-ripe for the recipe. The power pod spice mixes aim to make cooking an easy, stress-free and enjoyable experience.


Chicken Fajitas

Guacamole

Ingredients

1 avocado
Juice of half a lime
1 small clove of garlic
Half a spring onion

Method

Cut avocado in half and remove stone.
Scoop out avocado flesh, with a fork, roughly mashing it.
Squeeze the juice from half a lime.
Peel garlic and squeeze through garlic press.
Mix together avocado, lime juice and garlic.
If the avocado isn’t that ripe, blend the mixture in a blender.
Serve and enjoy.

guacamole

I was pleased to see that the power pods are 100% natural ingredients. They are free from oil, preservatives, additives and refined sugar and are also gluten free. The products were all long-dated, best before December 2021 and they have been handmade in the UK. The boxes indicate that you can make your meal for 4 people in just 30 minutes. And they also show how mild or spicy each mix is.

The outer box was nicely sized to fit through a letterbox, so no missing a parcel if your delivery arrives when you are out. And look how well packed it is, certainly no excess packaging.

Spice Power Pods

It is a nice touch to have a recipe suggestion on each packet, plus there are plenty more recipe ideas on The Spice Pioneer website. The power pods can be purchased individually or as a subscription. All are reasonably priced.

Do take a look at The Spice Pioneer website to see the rest of their products. They also sell a range of recipe boxes and gin infusion kits. Great gifts for foodies. Every purchase contributes to their tree planting in the Scottish Highlands, which definitely gets my seal of approval.

And I’m hosting a rafflecopter competition to giveaway a starter set of spice power pods like I received from The Spice Pioneer to one lucky winner. You’ll certainly be able to cook some great easy meals with these.

comper friendly badge

a Rafflecopter giveaway – Please click on the link to enter.

And you may see my other giveaways here.

I’d love to hear your recipe suggestions using any of these products. I’m going to make chicken lollipops next, so check back soon to see that recipe.

Visit Yet Another Blogging Mummy on Facebook, Twitter and Instagram

Move over hot dog, introducing the Chickfurter

I’ve been buying sausages from the local butcher this year, as I can take my own container to avoid any packaging, but I have previously purchased HECK sausages from the supermarket. Both the boys enjoy sausages. So when I heard that HECK were launching a new product, the Chickfurter, I was interested in the concept. Son1 is quite a hotdog fan, but it is a treat that he doesn’t often get the opportunity to try. Meanwhile son2 does not like hot dogs.

HECK Chickfurters

So I received two free packs of HECK Chickfurters to review. How would these go down with the boys?

First the nutritional side. They are gluten free like all the rest of the HECK range and contain 97% British chicken. Apparently the HECK Chickfurter is the only frankfurter on the market currently made of chicken breast, rather than mechanically reclaimed meat. That sounds good. I was also pleased to note that they had 9 days until the use by date, which is pretty impressive for a refrigerated product. Plus they are suitable for home freezing.

HECK Chickfurters

Each 320g pack contains 4 large chickfurters. I’m used to the method of cooking hot dogs in water, but the packet said to pan-fry for best results or to grill. So I opted to pan-fry them, serving them in traditional long rolls with ketchup and optional fried onion.

HECK Chickfurters

HECK Chickfurters

Son1 loved them and wanted two which at 72g each was a huge meat hit. I certainly couldn’t have eaten a second in one sitting. But son2 lived upto expectation and did not like them. He was in the minority though as the rest of us enjoyed them. I loved that smoky flavour.

HECK Chickfurters

And now to discuss the packaging. I knew that I would be compromising my ideal by receiving a packaged product but what type of packaging? It was a plastic tray covered with film in a cardboard sleeve. And at least the tray was not black plastic, as sorting equipment cannot detect the colour black. So all recyclable apart from the film, which could be eco-bricked, but it would be preferable to swap the tray and film to a more sustainable material. For instance when I buy frozen vegetarian sausages, those are just sold in cardboard.

Also by receiving the product via post, there was a lot of additional packaging in order to keep the product chilled during transit. So I would recommend purchasing in-store rather than online, although currently, the chickfurter has only been launched in Morrisons.

HECK Chickfurters

Do take a look at the HECK website to see the rest of their range. I was particularly interested to see they make a wide range of vegan sausages too. I was unaware of these previously. I’ve been eating meat-free more regularly recently and often adapt a sausage recipe to be veggie sausages for me, whilst the rest of the family have butchers sausages.

And I’d love to hear your recipe ideas for chickfurters.

Visit Yet Another Blogging Mummy on Facebook, Twitter and Instagram

Disclosure.  This post is a review of a product I was sent for free.  All opinions are my own.

Scallops or Chicken with Tagliatelle

Due to the likes and dislikes of my children, I sometimes struggle to come up with new meal ideas that we will all enjoy. And I don’t particularly wish to eat the same tried and trusted recipes, week in, week out. So I decided to experiment with making 2 variants on the same meal, either scallops or chicken with tagliatelle. The scallops were for son1 and me, whilst son2 who is very unadventurous could have chicken, oblivious to the fact that his had been cooked alongside the scallops.

Scallops with Tagliatelle


Scallops or Chicken with Tagliatelle

Ingredients (serves 3)

1 200g packet frozen scallops
1 chicken breast
2 cloves of garlic
2 tbsp olive oil
1 lemon
75ml chicken stock
150g frozen peas
salt and pepper
200g tagliatelle

Method

Defrost the scallops.
Defrost the chicken stock in a jug.
Squeeze garlic through garlic press.
Cut the chicken into small pieces.
Squeeze the juice from the lemon.
Add lemon juice to the jug of stock.
Bring a large saucepan of water to the boil.
Gently heat 1 tbsp of the olive oil in a wok.
Add chicken to wok.
Add tagliatelle to saucepan and cook for about 10 minutes.
Meanwhile gently heat other tbsp of olive oil in large frying pan.
Add garlic to frying pan.
After 1 minute, tip lemon juice and stock mixture over garlic.
Season sauce with salt and pepper.
Once chicken is almost cooked through, add scallops to chicken.
Turn scallops over after approx 3 minutes.
After approx another 3 minutes, tip sauce over chicken and scallops.
Add peas and cook briefly until peas are hot.
Drain tagliatelle and stir into wok.
Serve and enjoy, ensuring scallops are not on plate of anyone who doesn’t want.

Both boys gave me the thumbs up, so a good result.

Scallops or Chicken with Tagliatelle

Obviously this could be cooked with either chicken or scallops only. But I’d love to hear what recipes you cook multiple variants on.

Chicken with Tagliatelle

Visit Yet Another Blogging Mummy on Facebook, Twitter, Google+ and Instagram

BBQ Smokey Bacon Wrapped Chicken plus giveaway

Regular readers of my blog may remember that last year I was introduced to the Real Good Ketchup brand when I got a bottle as part of a competition prize. I used some in my meat loaf recipe which I shared with you.

I’m now a big fan of Real Good Ketchup which contains no added refined sugar and 70% less sugars and 70% less salt than other regular branded ketchups. It also has no artificial flavourings or preservatives. This is ideal for our family, particularly as son2 goes through ketchup at a rate of knots. He even has it in his favourite chicken and cucumber sandwiches. Ever since, I’ve been keeping my eye out for it to appear in my local branch of the Co-op, but sadly it hasn’t hit the shelves there yet, although can get via Ocado.

I’ve now received a bottle of the other flavour in the Real Good range, free to review. This is BBQ Smokey ketchup, which comes in a 285g glass bottle. And again with no added sugar.Real Good BBQ Smokey Ketchup

Of course, I had to try it out in a recipe so here is my BBQ Smokey Bacon Wrapped Chicken recipe. And for son2 who won’t eat bacon, I made some homemade chicken nuggets served with the BBQ Smokey ketchup as a dip on the side of the plate. You may page down for that recipe.


Chicken nuggets and BBQ Smokey bacon wrapped chicken

BBQ Smokey Bacon Wrapped Chicken

Ingredients (makes 6)

1 chicken breast
6 rashers of bacon
2 tbsp Real Good BBQ smokey ketchup
1 tbsp plain flour

Method

Cut the chicken into strips.
Sprinkle the flour over a chopping board.
Roll each chicken strip in a rasher of bacon.
Tip the BBQ Smokey ketchup onto a plate.
Place the bacon wrapped chicken strips on top of the ketchup.
Turn several times until they are smothered in ketchup.
Cook on a George Foreman grill (or similar) for about 8 minutes.
Serve with your choice of vegetables.
Enjoy.

Chicken wrapped in bacon


Homemade Chicken Nuggets

Ingredients (makes approx 20)

2-3 chicken breasts
1 slice of stale white bread
1 egg
salt
pepper
1 tbsp plain flour
1 tbsp olive oil

Method

Cut the chicken into small pieces.
Tear the bread into pieces and whizz to crumbs in food processor.
Season breadcrumbs with salt and pepper.
Beat the egg.
Sprinkle the flour on a chopping board.
Coat the chicken in flour.
Then dip in the egg.
Then roll in the breadcrumbs to fully coat.
Heat oil in frying pan.
Cook the chicken nuggets on a moderate heat, turning occasionally.
Serve with your choice of vegetables and BBQ Smokey ketchup.
Enjoy.

Homemade Chicken nuggets

3 of us loved the BBQ Smokey ketchup, but son2 preferred the original tomato flavour.

Real Good Ketchup is available in selected Morrisons Stores, Co-op, Ocado, Amazon, Wholefoods Market and selected health food stores. You can find local retail stores here http://realgoodketchup.com/find-your-local-store/.

Plus I’m hosting a rafflecopter competition to giveaway 1 bottle of Smoky BBQ flavour Real Good Ketchup to 3 lucky winners. Please note that winners can choose between receiving a product with Best Before date of end June 2018 or waiting until the next batch is made in late July.
comper friendly badge

a Rafflecopter giveaway – Please click on the link to enter.

And you may see my other giveaways here.

I’d love to hear your ideas for a recipe using either flavour of Real Good Ketchup.

Visit Yet Another Blogging Mummy on Facebook, Twitter, Google+ and Instagram

Family Fever

Disclosure. This post includes a review of a product I was sent for free. All opinions are my own.

Bulk cooking chicken

I sometimes find it makes sense to buy a larger volume of meat and bulk cook two meals at the same time. This is what I did recently with chicken thighs. I cooked pesto chicken and potato at the same time as a chicken casserole. So no cooking required the next day.

Chicken Casserole with Cheesy Dumplings

Chicken Casserole with Cheesy Dumplings

Chicken Casserole with cheesy dumplings

Ingredients (serves 4)

4 chicken thighs
2tbsp plain flour
1 tbsp olive oil
350g jar of pasta sauce
100g self raising flour
50g cheese
50g suet
pinch of salt
5tbsp cold water

Method

Preheat fan oven to 180 degree C.
Spread the 2tbsp plain flour across a chopping board.
Place the chicken on the board and turn several times to coat in the flour.
Heat the oil gently in a large ovenproof casserole pot on the hob.
Add the chicken and brown slightly for about 5 minutes, turning halfway.
Pour over the sauce.
Place lid on casserole pot.
Put the casserole pot on middle shelf of preheated oven and cook for about 45 minutes.
Meanwhile grate the cheese.
Mix, flour, salt, suet and grated cheese in a bowl.
Add the cold water and mix to a dough.
Form into 8 dumpling balls.
Remove lid from casserole pot.
Place dumplings on top of casserole and return to oven for a further 20 minutes.
Serve and enjoy.

Chicken Casserole with Cheesy Dumplings


Pesto chicken and potato

Pesto chicken and potato

Pesto Chicken and Potato

Ingredients (serves 4)

4 – 6 chicken thighs (depending on size)
2tbsp plain flour
700g potatoes
4 small onions
50g basil
1 clove of garlic
30g pine nuts
30g parmesan
3 tbsp olive oil

Method

Preheat fan oven to 180 degree C.
Grate the parmesan.
Freshly pick the basil and wash leaves.
Place basil, garlic, pine nuts, grated parmesan and 2 tbsp oil in blender.
Blend pesto for a couple of minutes, until happy with texture.
Add extra oil if desired.
Peel and chop the potatoes.
Peel and top and tail the onions.
Spread the 2tbsp plain flour across a chopping board.
Place the chicken on the board and turn several times to coat in the flour.
Heat 1 tbsp oil gently in a deep baking tray on the hob.
Add the chicken and brown slightly for about 5 minutes, turning halfway.
Spoon pesto generously onto the chicken.
Add the potatoes and onions.
Turn a few times to coat with oil.
Spoon any remaining pesto over the potatoes and onions.
Cook on top shelf of preheated oven for about 50-60 minutes.
Serve and enjoy.

Pesto chicken and potato

I only used 2 onions in this dish, as the boys won’t eat onions, but I recommend 1 small onion per person.

I’d love to hear what food you bulk cook.

Visit Yet Another Blogging Mummy on Facebook, Twitter, Google+ and Instagram

SaveSave

SaveSaveSaveSave

Britmums Rustlers Burger Hacking Challenge

Britmums have challenged bloggers to take the #RustlersHack Challenge to use Rustlers Southern Fried Chicken Burgers in a crowd pleasing balanced meal. And as one of the first 100 to sign upto the challenge, I received a free £20 Tesco giftcard to buy Rustlers Southern Fried Chicken Burgers twin packs and other ingredients.

#RustlersHack Challenge

Now on days when we need something quick to eat, due to other commitments in our busy lifestyle, I have usually relied on the slow cooker for our family tea. But of course that does mean that I need to be organised earlier in the day.

And I have to admit that I do already enjoy a Rustlers Cheeseburger when working night shift with a microwave as the only cooking option. However I hadn’t introduced the rest of the family to the delights of Rustlers.

#RustlersHack Challenge

They really are quick, as they only take 90 seconds in the microwave. I did contemplate buying some of those micro-fries for the hack, since no point in waiting for the lengthy time it would take to cook oven chips. That would totally defeat the speedy plan. Instead I decided to opt for a more healthy hack.

#RustlersHack Challenge

I quickly chopped up some vegetables, prepared a salad, sliced a selection of cheeses, opened some dips and coleslaw and popped a few rashers of bacon on our new George Foreman grill. Then I let everyone choose what they wanted for their own hack, as it is much more fun for the kids to prepare their own.

#RustlersHack Challenge

Of course the boys avoided the salad.

#RustlersHack Challenge

And greedy son1 took 2 chicken burgers and hacked them into a double towering stack.

#RustlersHack Challenge

Here’s mine including a large dollop of peppered mayonnaise that came in the Rustlers pack. I did notice at 140g that it was a smaller portion size than their cheeseburger, but I still felt full after eating it. And of course this will make it ideal for little hands and mouths unlike the piggy below with his towering stack.

#RustlersHack Challenge

Son1 said it was the best burger ever, so I don’t think my personal Rustlers night shift stash will ever be safe in the fridge again.

I was also very pleased to note that the packet indicates that the burger uses only the finest quality chicken which is fully traceable to the farm of origin. And they are nice and affordable, currently retailing at £2.50 for a twin pack at Tesco.

So I do recommend you pop along to Tesco and try the Rustlers Burger Hacking Challenge yourself.

Visit Yet Another Blogging Mummy on Facebook, Twitter, Google+ and Instagram

Disclosure. This post mentions products I purchased using a voucher that I was sent for free. All opinions are my own. This post is an entry for the BritMums Rustlers Burger Hacking Challenge, sponsored by Rustlers.

#ThankGoodness for two quick tasty Bolognaise recipes

Britmums have challenged bloggers to take the Dolmio #ThankGoodness Challenge to create a nutritious mid-week family meal. And as one of the first 100 to sign upto the challenge, I received a bundle of groceries from Tesco.

Tesco Dolmio hamper

When it comes to cooking on a school night, a jar of sauce like Dolmio, is a great bonus for a speedy meal. And son2 prefers the flavour of it, compared to when I do make a tomato sauce from scratch.

What Is In A Jar of Dolmio

A jar of Dolmio Bolognese sauce contains no artificial colours, flavours, preservatives or sweeteners. Always a plus point as far as I’m concerned. And a jar provides 1 of your 5 a day portions of fruit and veg for a family of 4.

What a lot of food in the delivery. Certainly more than enough for two meals, which is what I’m going to share with you now. The first night I decided to make a Chicken Bolognaise with Char-grilled vegetables.

Chicken Bolognaise with Char-grilled vegetables

Chicken Bolognaise with Char-grilled vegetables

Ingredients (serves 4)

4 chicken fillets
1 500g jar of Dolmio Bolognaise Sauce
1 aubergine
1 green pepper
1 courgette
1 large carrot
1 medium onion
2-4 tbsp olive oil

Method

Peel the onion and carrot.
Deseed the pepper.
Prepare the vegetables, chopping the aubergine and onions into discs and the other vegetables lengthways.
Cover the wire rack in your grill pan with foil.
Preheat grill to a moderate heat, using combined grill / fan setting if you have that functionality.
Add 1 tbsp of the olive oil to a wok and heat gently.
Add chicken to wok and cook for about 25-30 minutes, turning regularly.
Meanwhile place carrots on the foil and drizzle with olive oil, brushing the oil over them.
Place under the grill.
After about 5 minutes, add the aubergine, again drizzling and brushing with oil.
After about another 5 minutes, add the onion, again drizzling and brushing with oil.
After about another 5 minutes, add the courgette, again drizzling and brushing with oil.
After about another 5 minutes, add the pepper, again drizzling and brushing with oil.
Throughout this, keep turning vegetables as required to avoid burning.
If necessary, cover those vegetables that are more well cooked with those that are less cooked.
Once the chicken is fully cooked, pour jar of Dolmio Bolognaise Sauce over the chicken.
Allow sauce to heat fully.
Serve and enjoy.

Chicken Bolognaise with Char-grilled vegetables

A really tasty meal. The next night I went traditional with a Spaghetti Bolognaise with the addition of some more of the fresh vegetables for the adults. The boys prefer theirs just as it comes.

Spaghetti Bolognaise

Spaghetti Bolognaise

Ingredients (serves 2 adults and 2 children)

500g beef mince
1 500g jar Dolmio Bolognaise Sauce
250g spaghetti
1 onion
1 courgette
1 yellow pepper
200g mushrooms
2 tbsp olive oil
50g Parmigiano Reggiano cheese

Method

Peel the onion and deseed the pepper.
Chop the vegetables.
Add a few drops of olive oil to a pan of water and bring to the boil.
Add 1 tbsp olive oil to a wok and heat gently.
Add 1 tbsp olive oil to a frying pan and heat gently.
Add the mince to the wok, turning regularly.
Add the spaghetti to the saucepan and cook for 8 – 10 minutes.
Add the onion to the frying pan.
After a couple of minutes, add the rest of the vegetables to the onion. stirring regularly.
Grate the cheese.
Once the mince is fully cooked, pour jar of Dolmio Bolognaise Sauce over the mince.
Allow sauce to heat fully.
Drain the spaghetti.
Tip spaghetti onto dishes.
Cover two portions of spaghetti with the bolognaise.
Stir vegetables into the bolognaise before serving the other two portions.
Serve with grated cheese and black pepper.
Enjoy.

Spaghetti Bolognaise

Yummy bolognaise and some leftover for me to take to work tomorrow.

Spaghetti Bolognaise

Spaghetti Bolognaise

We all enjoyed both these meals. And I’ve still got plenty of the groceries left to use.

Visit Yet Another Blogging Mummy on Facebook, Twitter and Instagram

Disclosure. This post mentions products I was sent for free. All opinions are my own.
This post is an entry for the #Dolmio #ThankGoodness Challenge, sponsored by Dolmio. www.dolmio.co.uk.

Chicken and New Potato Hash

When I was a child, my dad used to grow most of our own vegetables, but he never bothered planting potatoes, as he said they would strip most of the nutrients from the soil, so that there wouldn’t be anything left for the following year’s crop. Instead my parents used to buy huge sacks of potatoes straight from the farm which would last us for months. But occasionally when they came into season, my mum would buy some new potatoes from the greengrocer. I loved how the texture and taste always seemed better than the potatoes we ate the rest of the year.

Nowadays we don’t have to wait for the British crop of new potatoes to be in season. Good job as it is the middle of winter. Instead just pop along to the supermarket, where in Tesco, you’ll find Cypriot new potatoes on the shelf in branches nationwide until the end of March.

Cypriot New Potatoes

I received a free £10 Tesco voucher to purchase ingredients including Cypriot new potatoes for a tasty recipe. For me, a new potato is all about the texture, so no point mashing it, making soup or using it in the slow cooker. Instead I’ve opted to boil my new potatoes and then make them into a yummy hash.

Chicken and New Potato Hash

Chicken and New Potato Hash

Ingredients (serves 4)

500g new potatoes
100g frozen spinach
150g mushrooms
2 tbsp olive oil
150g cooked chicken
2 eggs
salt
pepper

Method

Scrub the potatoes to remove any blemishes, no need to peel.
Chop into small pieces.
Allow the spinach to defrost.
Chop mushrooms into quarters.
Bring a saucepan of water to the boil and add the potatoes.
Boil for about 10 minutes until just cooked.
Add oil to wok and heat gently.
Add the mushrooms and then the potatoes and stir-fry gently for about 5 minutes.
Mix in the spinach and chicken.
Season with salt and pepper.
Crack the eggs directly into the wok and mix in.
Cook until egg has set.
Serve and enjoy.

Chicken and New Potato Hash

I’d love to hear what is your favourite new potatoes dish?

Visit Yet Another Blogging Mummy on Facebook, Twitter and Instagram

Disclosure. This post is an entry into the #CypriotNewPotatoes Challenge with Tesco and Foodies100. It mentions products I purchased using a voucher I was sent for free.  All opinions are my own.

Chicken and Lemon Traybake

I was inspired to try cooking a traybake by Easy Peasy Foodie who shared her Christmas Turkey traybake here. This sounded ideal for our Christmas dinner as I was planning to cook it at my parents’ house but also intending to arrive around midday, so time would be a limiting factor. However I wanted to try cooking a traybake in advance of Christmas, to avoid anything going wrong on the day, so this is the recipe that I came up with.

Chicken & Lemon Traybake

Chicken and Lemon Traybake

Ingredients (serves 4)

8 chicken legs and thighs
1 lemon
3 large potatoes
1 medium onion
8 mushrooms
2 sweet red peppers
8 cherry tomatoes
1 tsp dried rosemary
salt and pepper
2 tbsp olive oil

Method

Preheat fan oven to 180 deg C.
Chop the peppers into quarters lengthways.
Chop the lemon into 8 pieces, removing any pips.
Peel and chop the potatoes into small pieces.
Peel and chop the onion into 8 pieces.
Add the oil to a large roasting tray.
Heat in oven for about 1 minute.
Add all the vegetables except for the tomatoes.
Add the chicken.
Turn everything a few times to baste with the oil.
Sprinkle in the rosemary.
Season with salt and pepper.
Cover with foil.
Cook in preheated oven for about 1 hour, basting at intervals.
Remove the foil.
Add the tomatoes and cook for a further 10 minutes.
Serve with a selection of green vegetables and enjoy.

lemon & chicken traybakeWe all agreed it was a very tasty meal. And I felt happy and ready to then follow up by cooking a Christmas turkey traybake for 10 people. I used 3 roasting trays for such a large number and did as much vegetable prep as possible in advance at home before driving to my parents’ house. I used turkey steaks and a selection of vegetables comprising potatoes, baby carrots, parsnips, sprouts and sweet peppers, but cooked the pigs in blankets separately since the meal needed to be gluten-free for one person. Sorry no photos of my Christmas traybake, as too much else going on.

I’d love to hear your ideas for a traybake?

Visit Yet Another Blogging Mummy on Facebook, Twitter, Google+ and Instagram

Link up your recipe of the week

Tasty Tuesdays on HonestMum.com